Every time I attend a talk, watch a video, or read an article on crop nutrition, the moment I hear the words “Nutrient X is important for [pollen formation / photosynthesis / insert any other process in the plant]”, I switch off.
Whilst it is entirely true that different nutrients perform very different functions within the plant, it betrays a fundamental lack of understanding, or attempt, to identify and fix the problem.
What really matters is our ability to analyse and test for potential deficiencies, then set a course of action to correct them in order to protect crop yield and quality.
There are many ways of doing this; soil testing helps suggest that the crop MIGHT get hold of from the soil, visually looking at the crop tells us if we have a very serious problem that has already probably caused irreversible damage, Grain Nutrient Analysis tells us what nutrients actually made it into the crop in the end historically so cannot do anything about except in future crops.
This is why Leaf Tissue Analysis is very useful; it gives a snapshot, in the growing season of issues that are developing and may not be visible to the eye, before they become too serious.
Like all tests, they are a guide, so if you suspect a problem, try different means of addressing it. I am looking at different foliar copper products in cereals at the moment for example; I have tried dressing seed and fertiliser with copper but without success, I know that foliar copper products reliably increase yield on most of our soils from our own trials, and I now seek to further my understanding of different timings and formulations to enhance this.
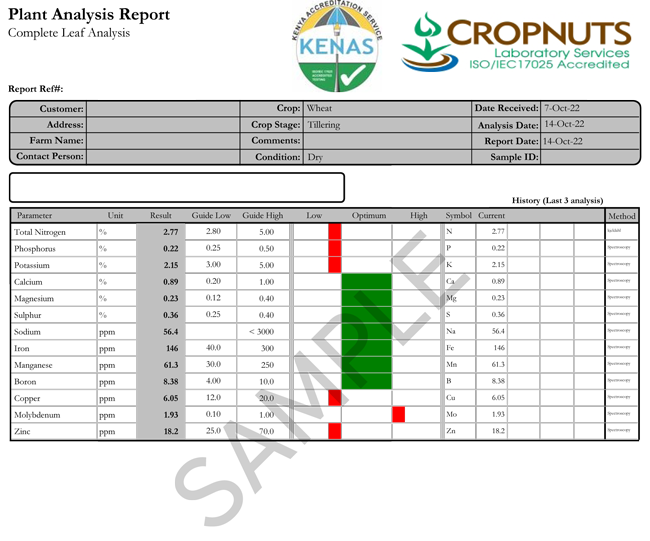
When you take a leaf sample, in young plants (typically up to tillering in cereal or 5 leaf in maize) take the entire plant. Beyond this, take the newest emerged leaf. I also take leaf samples in maize during grain fill, from the leaf attached to the stalk directly below the cob.
Take at the same time of day – mid-morning if my preferred time, then I wrap them in a breathable paper bag and send them to a laboratory without delay. And make sure the sample is clean – no soil contamination or dirty hands.
Once you get the leaf test result back, these are some of my learnings over the years….
| Nitrogen | Nitrogen can change very quickly. In reality, a healthy fast growing crop should often be slightly on the high side of the guideline high threshold, especially tillering cereals for example – a week later and they can be visually deficient in the field, from what was a perfectly adequate level on the leaf test. |
| Phosphorus | Phosphorus deficiency is generally considered to be very reliably measured by a leaf test. Which is useful as it is often a limiting nutrient for us. A word of caution; in very deficient situations, P on a leaf test can be very high, even though the plant is visually purple and stunted. I am yet to receive a satisfactory explanation as to why this is so it remains an enigma to me. |
| Potassium | Perhaps less reliable nutrient in a leaf test. Sap analysis is the best way to check K status if you suspect a deficiency in a crop, although in most areas of Kenya this is unlikely. |
| Calcium | Having seen low calcium in leaf tests for many years and attempted to correct it with foliar sprays and lime etc, I have a suspicion that many guidelines are too high, especially for minor legume crops. If you leaf test is low, start trying things but do not be overly alarmed. |
| Magnesium | Magnesium thresholds are good, until you get cold and wet soils. Often a cereal crop will be well supplied, but will show up classic striping on the leaves in cold and wet weather. The leaf test shows that it is actually ok, so is a really useful guide. I see lots of samples from the slopes of Mt Kenya like this in May and November! |
| Sulphur | Sulphur can be very mobile around the plant, and I have often found that big applications will push up leaf sulphur levels in canola and cereals, but are not reflected in the final yield. Lots of leaf samples sit towards the lower end of the guideline levels but are actually fine. In general sulphur leaf testing is not a great guide as to whether you are going to see a response in the crop unless it is very deficient, in which case you will see the classic yellow younger leaves. |
| Sodium | Of minor importance to most crops and rarely an issue. |
| Iron | Best tested via a sap test, if you suspect a problem |
| Manganese | Always worth checking on crops like peas. On high pH soils the crop will usually tell you if it is Mn deficient as it will be light green and floppy, except where the soil is firmer on tractor wheelings. |
| Boron | This has to be seriously low to cause problems in cereals. Occasionally I do see a response in trials of 0.3 t/ha or so, but unless levels in the plant are well below 2ppm, you don’t have a problem. |
| Copper | This goes up and down rapidly as the plant grows. In cereals it often drops from 15ppm after a foliar spray, down to 5ppm, so as long as you apply foliars little and often, you can afford to drop below the guideline low temporarily. |
| Molybdenum | More of an issue in pulses. I spent years trying to increase Molybdenum levels in the plant with foliar sprays, then tried seed dressing with just a few grams and it is far more effective! |
| Zinc | Rare to see very deficient plants, but if you are on the low side of a leaf test and the crop is struggling in any way, you can often see a response. It is one of the few elements where the guideline low could sometimes be set higher, especially in barley. |
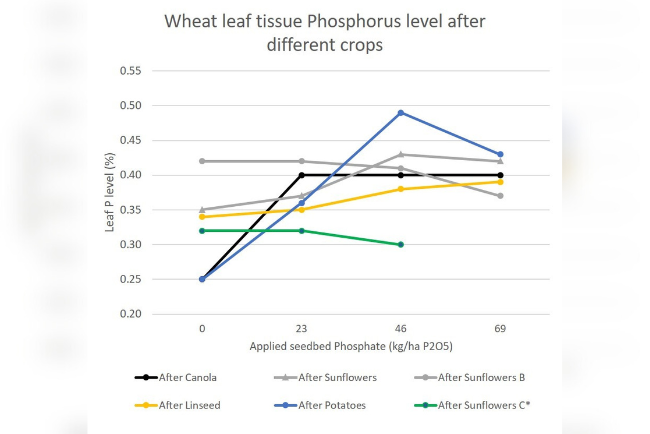
Above is a graph of leaf test Phosphorus in wheat, taken at late tillering, on soils where the Phosphorus level is below 15ppm. You can see how the leaf P increases in line with increased rates of phosphate fertiliser, and how different previous crops can affect the uptake of P (canola and heavily cultivated potatoes have minimal mycorrhizae for example. Sunflowers are highly mycorrhizal so even plants without P seedbed fertiliser are able to take up useful amounts of P).

In a new series, I am going to write about an actual crop each month, discussing the realities of farming from the things we got right, to the regrets and disappointments with the weather that we have endured along the way.
“Field 2” at Naivasha is a beautiful location for a wheat crop. Situated in Nakuru County (Kenya) just under the Mau Escarpment at 2,000m it is a deep, fertile loam with around 5% organic matter. The farm was planted in mid-May, aiming for a late September or Early October harvest, to avoid the August rain which can often interrupt harvest.
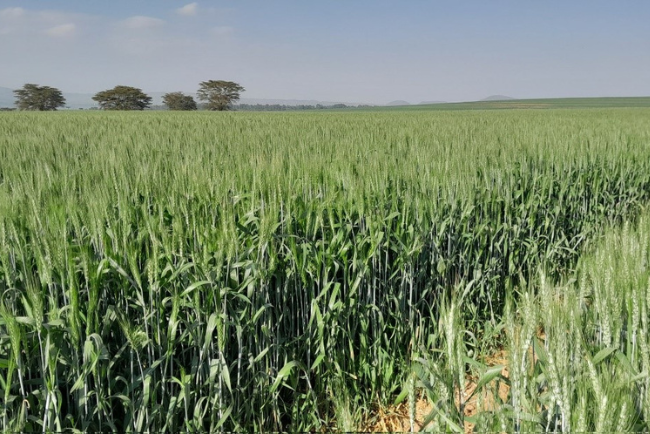
We only grow red wheats with good sprouting resistance at this farm because of the likelihood of a wet harvest, and we often struggle with poor bushel weights at this location. This may in part be caused by low sunlight levels in July and August, but also Fusarium from previous decades of continuous wheat.
Mwera is a great variety for this situation, with sprouting resistance and inherently high bushel weight. We sowed the crop at 200 seeds/m2 (around 90kg/ha) to strike a balance between a competitive crop without a high lodging risk.
The soil tests on this farm are around 20ppm of Phosphate, so we planted with 100kg/ha of DAP. Over the years the soil pH has been relatively constant at between 6.5 to 7 – making this one of the few farms I visit that does not have an issue with acidity.
Magnesium levels are high and a low of sulphur is released into the atmosphere around Naivasha; a few years ago I did some trials with Magnesium Sulphate in maize and wheat and found no response, so did not further investigate either of these nutrients.
2.5 l/ha of a 500g/l pendimethalin was applied pre emergence of the crop – this is more than enough for a field which had canola two years ago so has a relatively low grass weed pressure. We applied at no more than 12kph with a Defy 3D nozzle to achieve good coverage.
At the very end of tillering we applied epoxiconazole + thiophanate as a T1. I like this approach because it is the strongest option available on Yellow Rust, starts the Stem Rust protection, and does enough on Septoria to protect the lower leaves.
We applied two doses of 40+6S topdressing. I am a big fan of getting nitrogen into the crop early in case you don’t have the chance later on – the ideal timing might be at tillering, but you have little to lose by applying 75-100kg at the 2-3 leaf stage, and a lot to gain if there is no rain later.
Bixafen + prothioconazole + tebuconazole was applied on the flag leaf; it is strong on Septoria, good enough on Stem Rust and takes a lot of Fusarium pressure off the ear – a fact often overlooked. We have now gone back 11 days later with tebuconazole + azoxystrobin for Fusarium protection and to top up Stem Rust protection. I always emphasise with Fusarium that it is only effective at early flowering, so ignore days since the last fungicide and focus on hitting the target.
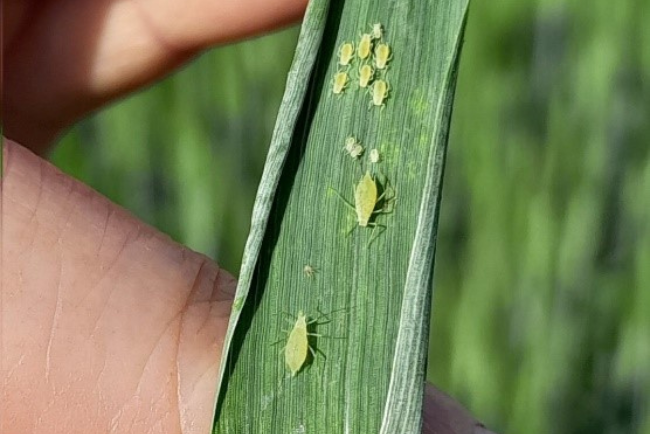
I found Rose Grain aphids (above) in the crop. These can cause direct feeding, but once the crop is during grain fill it is only economical to spray when more than two-thirds of tillers are infected. Monitor the crop and only treat when at threshold. If there is rain forecast this often solves the problem very quickly.
Having recently visited some farming events in the UK I have received a lot of questions about why we cannot grow their winter wheat varieties in Kenya. After all, there are some excellent breeding programs that are now incorporating high yields with very good disease resistance and even traits such as Barley Yellow Dwarf Virus resistance.
The problem lies in the adaptation of wheat to specific environments. This makes it a very successful plant in its own locality, but means that it does not travel successfully to different geographies.
Flowering in wheat is regulated by photoperiod, or in simple language, day length. In far Northern or Southern hemispheres this can be as long as 18 hours in summer time, or 6 hours in winter. As day length increases, the plant starts the process of reproductive growth and ultimately flowers.
Winter wheat, on top of the day length effect also has a requirement for what is known as vernalisation. In plain English this means that the plant has to go through a cold period in order for it to begin reproductive growth, and eventually flower.
To look at the positive side of this, a local breeding program with local knowledge and expertise will always be better than imported material, so we can be grateful for the likes of KALRO at Njoro and for CIMMYT, for breeding material for our specific challenges and issues.

Till next time,
David Jones
Independent Agronomist
How would you rate our article?
Think Agronomy is brought to you by Cropnuts and the Centre of Excellence for Crop Rotation. We share the same vision for sustainable, dryland farming across Africa, and Think Agronomy is our independent voice to promote profitable, climate-resilient farming through better management of soil health, systems-based agronomy, crop diversification, and farm mechanization.
Order our services and get to know how to improve your soil for better yeilds.


Even when fertilizers are applied, plants don’t always get the nutrients they need. Nutrient availability depends on several soil and environmental factors, and optimizing these factors can significantly boost plant uptake and improve crop performance. 1️⃣ Nitrogen (N) Apply nitrogen in split doses to reduce leaching losses, especially in sandy soils. Organic matter additions improves […]
Read More
Cation Exchange Capacity (CEC) is a fundamental soil property that influences how well soils retain and supply essential nutrients to crops. Knowing and managing your soil’s CEC enables growers to reduce fertilizer waste, optimize input costs, and improve long-term soil health. 1️⃣ What is CEC? CEC measures the soil’s ability to hold and exchange positively […]
Read More
Even when fertilizers are generously applied, plants don’t always get the nutrients they need. Why? Several key soil and environmental factors influence how effectively plants can access and absorb nutrients. These are: 1️⃣ Soil pH Soil pH determines how easily plants can take up nutrients. Most crops thrive in a pH range of 5.5–7.0, where […]
Read MoreGet best agronomy articles, curated content, future issues of AgriTech, case studies, and best practices sent directly to your inbox.
Crop Nutrition Laboratory Services, Limuru, off Limuru road, P.O. Box 66437-00800 Nairobi – Kenya
CROPNUTS GROUP
Kenya, Limuru
+254 711 094 444
support@cropnuts.com
Nigeria, Ibadan
+234 803 978 4205
agriserve_ng@cropnuts.com
Zambia, Lusaka
+260 97 742 2250
support_zm@cropnuts.com


